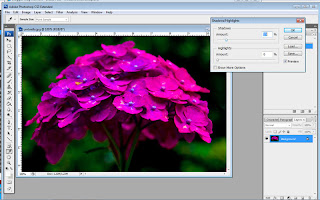
 Jim Morgenthaler of Athens, Georgia judged the photography critique for the Roswell Photo society on July 12. I learned an important new skill during his comments. He said we should be using the Shadows/Highlights feature. Select the following from the main screen in Photoshop:
Image
Adjustment
Shadows/HighlightsAdjustment
The window on the right pops up. Below, on the left below is a before picture. On the right is a photo that I adjusted and pulled the slider down to about 15%. This is plenty of highlights for most photographs. Notice you can now see the green underneath the flower (the shadow section).
And, as a final note, should Jim judge again, he prefers us to use glossy paper to pull in the full tonal range of colors. My image, Morning! placed 3rd in the color prints category this evening even though it was on matte paper!
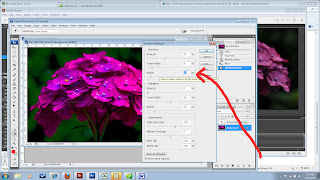
www.cactushuggers.etsy.com has added a comment and I reworked the photograph below and included this new screen shot explaining his comment. I like this version of Pink Umbrella much more. Thank you.
Check the [Show More Options Button].
 Then, this dialog box appears. I changed these sliders until I was happy with the image.
And, I end up with an even better photograph. Thank you so much! Which version do you like? This image, Pink Umbrella, is available in my Etsy shop.
www.cactushuggers.etsy.com has added a comment and I reworked the photograph below and included this new screen shot explaining his comment. I like this version of Pink Umbrella much more. Thank you.
Check the [Show More Options Button].
 Then, this dialog box appears. I changed these sliders until I was happy with the image.
And, I end up with an even better photograph. Thank you so much! Which version do you like? This image, Pink Umbrella, is available in my Etsy shop.


2 comments:
Excellent tips and really great example. Make sure to use the pixel radius slider to eliminate halos caused by shadows adjustment.
Best wishes to a talented photographer Magmomentbuddy
Congrats, Hazel. Great demo too.
Post a Comment